
Photoshop tutorial: Glowing Typography
In the following tutorial we are going to make some nice glowing letters.
So go and sit comfortable for the tutorial.
(Requirements: Adobe Photoshop)
Result: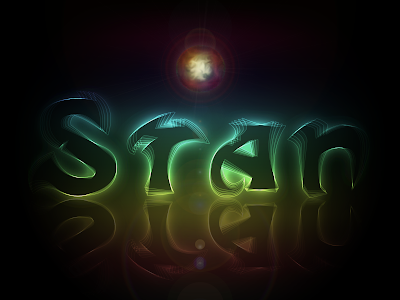
This is my first tutorial, done a long time before, so no images are included. Though I hope you can manage.
Hello people,
How to make a glowing text (Example)
(images for this tutorial will be added later on)
Step one: The layer masks
a) Make a new image that is 1600x1200 pixels. Then make a new Gradient Adjustment Layer with a linear gradient that goes from a dark gray (#464646) at the bottom to black (#000000) at the top (Default settings except for the gradient colours).
b) Make another linear Gradient Adjustment Layer above the previous one, with rainbow colours. There are some colourful presets that you can choose from in the gradient palette.
Set the layer's Fill down to 25%. Then set the layer's blending mode to Color.
Tip: When you set the blending mode to color it makes it so the layer only affects the color of everything below it, while leaving the lightness/darkness alone.
c) Finally make another Gradient Adjustment Layer above the previous two. This one will be a radial gradient. Set this one up so that the only 2 colours in the gradient are black (set the mode to BG to transparency)
If you see that black is covering the center of the image, check the Reverse box. Then make it so the black goes around the edges of the canvas. Set the layer opacity to 65%. I moved the transparency handles around a little to get the exact effect that I wanted.
Hint: I have grouped the layer masks for a better view in the layer window
Step two: The text
Now lets begin with the text. Hit (T) for the type tool, and make a (single click) on the canvas. Then type your letter, in my case the letter S. Then grab the Move tool and (Hit Ctrl T) and transform the letter, adjust it until it's the size that you want it. Hit (T) again for the type tool, and if it's not already, make the letter black by clicking the text color box in the property bar. Set the letter layer's blending mode to Screen. This will make the letterdisappear.
Step three: The text effects
(Double click) to the right of the letter layer's name in the layer palette to bring up the layer styles window. Put an Outer Glow and a Stroke on the layer with the exact settings that you see in the image below. You will see a very faint image of the letter now.
Outer Glow and Stroke Settings:
Outer Glow:
Blending mode: Color Dodge Opacity: 20% Noise: 0 Colour: White
Stroke:
Size: 2px Position: outside Blend mode: Colour dodge Opacity: 50% Fill Type: Colour Colour: White
Let's use this first letter as a starting point for all the text in the image. Once we layer several different letters on top of each other, our effect will come to life.
Step four: The rotations
Duplicate the letter layer by dragging it down to the New Layer button at the bottom of the layer window. Select the type tool (T) and then change the rotation of the letter on the new layer.
Now do this step 4 times so you rotate from the basic two times to the right and two times to the left. I chose to use the same amount of rotation for each letter.
Step five: Grouping and making the other letters
Select all the text layers that you have. Then hit (Ctrl G) to group them. With the group selected in the layer palette, hit (V) for the move tool. Then (while holding ALT), click and drag on the letters on the canvas to duplicate them. Drag them to the right where you want the next letter to be. Now there should be 2 groups of text in the layer palette. Turn off all the letter layers in the new group (except the bottom one) by clicking in the little 'eye' icon next to each one.
Now select the text tool (T), and highlight the single letter. Then change it to the next letter that you want, in my case an t. Finally, turn the S layer off. Then turn on the next one and do the same. Repeat this until all the letters in your new group are changed. Turn all the layers back on.
Repeat this step for each new letter you need.
Step six: The reflection
Duplicate every letter group and flip them vertically. Now you should have something like a reflection.
Step seven: The finishing touches
a) Make a new layer and take the paintbucket tool (G) to fill it with black (#000000) Then make a Lens Flare (Filter>Render>Lens
Flare) Set the brightness to somewhat near 55%
b) Make a sphere with the Elliptical Marquee tool (M) of the size of the Lense Flare (Main part) and fill it with a rainbow gradient.
c) Duplicate the rainbow sphere layer 3 times (total of 4 rainbow sphere layers) and rotate 2 of them 90 degrees.
d) Set all rainbow sphere layers to Fill: 50% ,Opacity: 50% and blending mode: Overlay
e) Make a new Adjustment Layer mask: Photo Filter and set it to Warming Filter (85)
f) Go back to the lense flare layer and smugde the inside (white) with the red/orange part (Main part)
Hint: Group these finishing touches in one group to get a clearer view in the Layers window
If you would like to give it one colour, just make a new layer on top of the others and fill it with whatwever colour you like and put the blending mode to Colour


