WIP: Crystalised

Hey guys,

I'm trying to make a come-back here ;)
I really want to try to make one post every sunday > probably about one of my artworks I am busy with/just have finished.

Crystalised:


Still working on it.
Any tips?


~http://www.think-creative.deviantart.com


Read more...

The iQ font - Toyota

Today on iLT (ilovetypography.com) I noticed an interesting post about a font made by an overhead camera and a car. You can view more in this movie:

iQ font - When driving becomes writing / Full making of from wireless on Vimeo.


Or just look at iLT or Toyota <-- you can download the font there too!


Read more...

Typography Experiment

Today I have been experimenting a bit with the layer styles of photoshop.

The result:


You can click on the image for the PSD-file.

Feel free to share but please credit me!


DeviantArt link - http://think-creative.deviantart.com/art/Darkness-Typoghraphy-130697739


Read more...

3D Typography


3D typography has been inspiring me a lot lately, so the images on Marcofolio.net have helped me greatly. The list of more than 20 images about 3D typography + 5 tutorials about it (on Marcofolio) can be viewed HERE.


Read more...

Daily Inspiration #10

Todays inspiration is about 3D typography.
Some great examples I have found on DeviantArt:


''Art-line'' by Luuqas:


''Typography on a hill'' by BloodyHippo:


''Everybody loves typography'' by Luybax:


Read more...

Daily Inspiration #9

Great work from Brandon Charles on BehanceNetwork. Brandon Charles has designed some great Typography. His own website can be viewed HERE.

An example:


More of Brandon's work: Brandon Charles Designs Portfolio


Read more...

Photoshop Tutorial; Terra Typography


Hello readers,

Today I have seen a cool tutorial. It's about making a cool bright 3D text with some doodads around it. I know it sounds kinda boring but the result is amazing! So why not take a look?

Tutorial: Terra Typography


Read more...

Photoshop Tutorial: 3D text Effect

Requirements: Adobe Illustrator, Adobe Photoshop

Result:


Step 1
The 3D text is made in illustrator (or any other program). So pick the type tool and type your text.
Letter By Letter!
Then Align all the letters, by clicking on the ’’align bottom’’ button
Add the 3D effect by adding ‘’Extrude & Bevel’’ (Effect>3D>Extrude & Bevel)
Just random rotate the cuboid to get a nice result.


Step 2
Now lets copy the text into Photoshop. Select all the letters and copy them (ctrl+c)
Open up photoshop and pase them (ctrl+v) as a ’’Smart Object’’


Step 3
Lets get some cloud brushes (for free: here)
And brush them in two new layers, one on top of the 3D text and the other one below. And scatter it around a bit. (ignore the blur, tiny mistake from me, it wont affect the result)


Step 4
Add the rainbow; make select a small strip in a new canvas and fill it with a rainbow gradient. From top to bottom. Then select the Polar to Coordinates filter (Filters>Distort>Polar-to-Coordinates)


Step 5
Copy the rainbow into your original canvas (your 3D text, clouds image) and place it beneath your 3D text layer (above the 2nd clouds layer) . Select the following part: (maybe add a bit of feather (6px) (Select>Modify>Feather) and press Delete on your keyboard.
(Set the mode to screen)


Step 6
Now duplicate the layer and place it on top of all layers
(Set the mode to Hard light)


Step 7
Let’s create the bubbles. Select a 19px feathered round brush and add a scatter effect. Than play around with the position of the spots.


Step 8
For the colouring we just add a simple rainbow gradient on top of all layers. And set the mode to colour

Playing around with the effects will give the best result.

__________

Thanks for reading, Comments are appreciated!


Read more...

Kinetic Typography

After a few months making designs with photoshop I decided to focus mainly on advanced typography (Typography in motion, effects with typography, logo's etc.). So at the moment I am searching for some video's which show cool designs of typography in motion and images of advanced typography.


A few examples I have been searching for:
Dutch commercial from Achmea
Citizen Cope - Let The Drummer Kick (AFX) (Kinetic Typography)
SmashingMagazine inspiration about Typography
SmashingMagazine Typographic Posters
Scott Hansen's Typography


Read more...

After Effects tutorial: Kinetic Typography

Today I have noticed a very cool and relatively simple tutorial on AEtuts.com. It is about making the cool typographic effectt: Kinetic Typography also called Text in Motion.
At the moment I am making something like that step by step. It takes a long time to get every piece aligned very well and every word has his own layer. But when I'm done I will show you the result.


Read more...

Photoshop Experiment #1: Misc Typography


This is not a tutorial, but just something I found out in Photoshop CS4, which I wanted to share. So it is not as accurate explained as a tutorial.

As I was making a Gift for my friend on gimper.net (Shadow).
1. So I started with the background, Just black and putting red spots (scattered all around).


2. Then just played around with blur, finally I took shape blur and took the following shape:


3. Then just took a decent font and added some layer effects (just play around)
I used the following settings:


4. Then I created those 1px lines, just take a round brush, 1px and use the following settings to create the same:


Then make one little dot where you want to start (the middle) and hold shift and make a little dot at the same height but then at the border.


Read more...

Photoshop tutorial: Light text effect


Hello dear readers,
this time I am going to show you how to make
this light text effect. (Click on images to make them bigger)
(For this tutorial I have only used Adobe Photoshop CS4 Extended but I'm sure this tutorial can be used in previous versions or other design editors too)
Requirements: Adobe Photoshop

Step 1
The first thing we need to do is creating a background for our image. So create a new document (I have used 350x150px).


Then we fill the canvas with clouds (Filter > Render > Clouds) (Foreground colour: #18323a, Background colour:#000000).


Step 2
Now we are going to make the text. Type your text with the font you like in white(I have used ''Dark Crystal ''s'' from dafont.com). First duplicate the text layer by dragging it to the ''New layer'' button or by clicking with the right mouse button and press ''Duplicate Layer''. We will need this layer later. Secondly we add some layer effects (Layer > Layer Style > Blending Options)
(Note: for each blending option use the settings from the images below)
  1. Drop Shadow
  2. Inner Shadow
  3. Outer Glow
  4. Inner glow
  5. Bevel and Emboss
  6. Colour Overlay


Now take the duplicated layer and change the colour of the text to some sort of light blue (#5cdbff). Place this layer behind/under the non-duplicate layer and move it up by one or two pixels (Press CTRL + Arrow up)


Step 3
In this step we are going to make the glowing swirl around the text. So take the pen tool and just make straight line to each point (on a new later). Now by using the Convert to point tool (right click on the Pen tool icon and select Convert to Point tool) make curves. Do this by dragging the squares of path in another direction so you will get nice smooth curves.


Now stroke the path by going to the Path channel right click on the path and choose stroke path (Be sure that the brush is a round 5px brush). Now stroke it again but be sure that the brush's size and count jitter are on 100% and scatter is on 1000%. Now put the layer blending style to Linear Dodge (Add) and Fill: 50%. Now erase some parts which overlay the letters (Flowline overlay, does not overlay, overlay, does not etc..)so it looks like he is going in front and then behind and then back to the front etc.

Step 4
Now lets create the nice rainbow effect. Create a new layer and take the Gradient tool (Select the square Diamond Gradientshape). Select a rainbow Colourgradient (the one withut transparency) Tick the reverse button and drag fromout the middle till a few pixels above your canvas (Hold shift while dragging to get a straight line). Change the layers blending style to Hue.


Step 5
For this step we need to have the default black and white colours. When you still have the gradient map (Select the Radial Gradientshape) and select Foreground to transparent as a Colourgradient. Now drag fromout the middle to one of the edges (maybe a little bit further) (hold shif
t again while dragging to get a straight line).
The last touch: make a lense flare in the middle (Filter > Render > Lens Flare) Just keep the default settings but place the lens flare almost exactly in the middle. Now press okay. and you are done.

Congratulations! You made a cool light text effect:


(Note: If anything went wrong or if anything misses please comment, if it went well comment, and post a link to your result)


Read more...

Photoshop tutorial: Glowing Typography

In the following tutorial we are going to make some nice glowing letters.
So go and sit comfortable for the tutorial.

(Requirements: Adobe Photoshop)


Result:
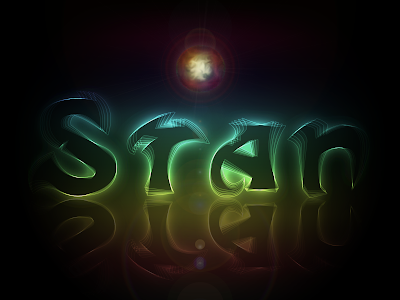
This is my first tutorial, done a long time before, so no images are included. Though I hope you can manage.

Hello people,

How to make a glowing text (Example)
(images for this tutorial will be added later on)

Step one: The layer masks

a) Make a new image that is 1600x1200 pixels. Then make a new Gradient Adjustment Layer with a linear gradient that goes from a dark gray (#464646) at the bottom to black (#000000) at the top (Default settings except for the gradient colours).

b) Make another linear Gradient Adjustment Layer above the previous one, with rainbow colours. There are some colourful presets that you can choose from in the gradient palette.
Set the layer's Fill down to 25%. Then set the layer's blending mode to Color.
Tip: When you set the blending mode to color it makes it so the layer only affects the color of everything below it, while leaving the lightness/darkness alone.

c) Finally make another Gradient Adjustment Layer above the previous two. This one will be a radial gradient. Set this one up so that the only 2 colours in the gradient are black (set the mode to BG to transparency)

If you see that black is covering the center of the image, check the Reverse box. Then make it so the black goes around the edges of the canvas. Set the layer opacity to 65%. I moved the transparency handles around a little to get the exact effect that I wanted.
Hint: I have grouped the layer masks for a better view in the layer window

Step two: The text
Now lets begin with the text. Hit (T) for the type tool, and make a (single click) on the canvas. Then type your letter, in my case the letter S. Then grab the Move tool and (Hit Ctrl T) and transform the letter, adjust it until it's the size that you want it. Hit (T) again for the type tool, and if it's not already, make the letter black by clicking the text color box in the property bar. Set the letter layer's blending mode to Screen. This will make the letterdisappear.

Step three: The text effects
(Double click) to the right of the letter layer's name in the layer palette to bring up the layer styles window. Put an Outer Glow and a Stroke on the layer with the exact settings that you see in the image below. You will see a very faint image of the letter now.
Outer Glow and Stroke Settings:
Outer Glow:
Blending mode: Color Dodge Opacity: 20% Noise: 0 Colour: White
Stroke:
Size: 2px Position: outside Blend mode: Colour dodge Opacity: 50% Fill Type: Colour Colour: White

Let's use this first letter as a starting point for all the text in the image. Once we layer several different letters on top of each other, our effect will come to life.

Step four: The rotations
Duplicate the letter layer by dragging it down to the New Layer button at the bottom of the layer window. Select the type tool (T) and then change the rotation of the letter on the new layer.

Now do this step 4 times so you rotate from the basic two times to the right and two times to the left. I chose to use the same amount of rotation for each letter.

Step five: Grouping and making the other letters
Select all the text layers that you have. Then hit (Ctrl G) to group them. With the group selected in the layer palette, hit (V) for the move tool. Then (while holding ALT), click and drag on the letters on the canvas to duplicate them. Drag them to the right where you want the next letter to be. Now there should be 2 groups of text in the layer palette. Turn off all the letter layers in the new group (except the bottom one) by clicking in the little 'eye' icon next to each one.

Now select the text tool (T), and highlight the single letter. Then change it to the next letter that you want, in my case an t. Finally, turn the S layer off. Then turn on the next one and do the same. Repeat this until all the letters in your new group are changed. Turn all the layers back on.

Repeat this step for each new letter you need.

Step six: The reflection
Duplicate every letter group and flip them vertically. Now you should have something like a reflection.

Step seven: The finishing touches
a) Make a new layer and take the paintbucket tool (G) to fill it with black (#000000) Then make a Lens Flare (Filter>Render>Lens
Flare) Set the brightness to somewhat near 55%
b) Make a sphere with the Elliptical Marquee tool (M) of the size of the Lense Flare (Main part) and fill it with a rainbow gradient.
c) Duplicate the rainbow sphere layer 3 times (total of 4 rainbow sphere layers) and rotate 2 of them 90 degrees.
d) Set all rainbow sphere layers to Fill: 50% ,Opacity: 50% and blending mode: Overlay
e) Make a new Adjustment Layer mask: Photo Filter and set it to Warming Filter (85)
f) Go back to the lense flare layer and smugde the inside (white) with the red/orange part (Main part)

Hint: Group these finishing touches in one group to get a clearer view in the Layers window

If you would like to give it one colour, just make a new layer on top of the others and fill it with whatwever colour you like and put the blending mode to Colour


Read more...